Streamlining Governance Notifications in AWS Organizations with Automation

In the ever-evolving world of AWS, maintaining the security and organization of your accounts is paramount. If you’re managing multiple AWS accounts within an AWS Organization, you might be concerned about tracking changes such as the movement of an account from one Organizational Unit (OU) to another.

Fortunately, AWS offers robust tools to help you keep tabs on these changes. In this blog post, we’ll explore how you can use a serverless Lambda function in conjunction with AWS CloudTrail and CloudWatch to be promptly notified whenever an account is moved from one OU to another.

Understanding the AWS Organization

AWS Organizations simplifies the management of multiple AWS accounts. It enables you to organize accounts into OUs, allowing you to better control access policies, billing, and resource sharing. However, with great power comes the need for oversight.

The Tools at Your Disposal

  1. AWS CloudTrail: CloudTrail records all API calls in your AWS account. By enabling it at the Organization level, you can track every change within the Organization, including account relocations.
  2. AWS CloudWatch Events: CloudWatch Events allow you to respond to changes in your AWS environment. By creating rules that trigger on specific CloudTrail events, you can respond in real-time.
  3. AWS Lambda: Lambda is a serverless compute service that allows you to run code without provisioning or managing servers. It’s the glue that ties everything together in our solution.

The Lambda Function

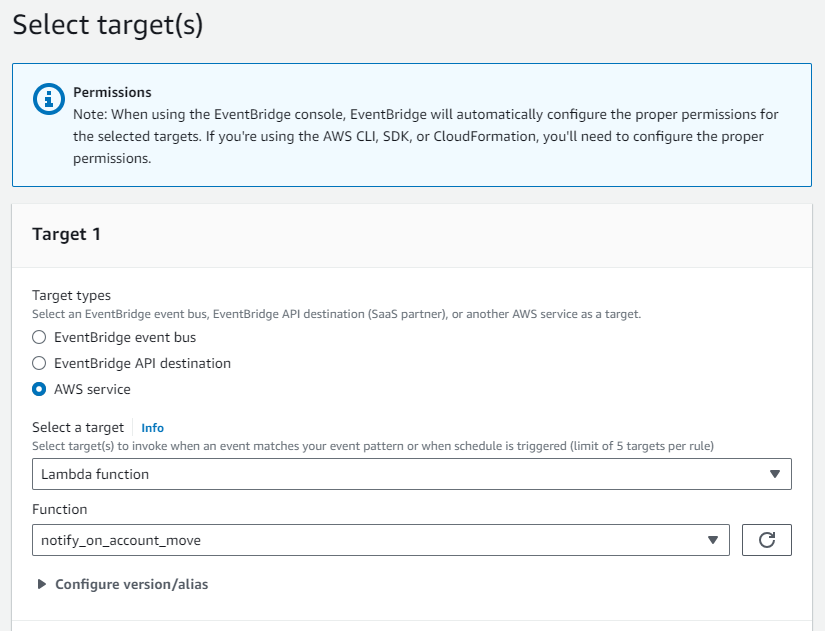
The first step in this process is to create a Lambda function that will be triggered by a CloudWatch Event. This function should be equipped to parse the event, extract relevant information, and send out notifications when an account is moved between OUs.

Here’s a high-level overview of the Lambda function’s steps:

  1. Receive the CloudTrail event.
  2. Parse the event to identify changes in OU memberships.
  3. If the event indicates an account relocation, send out a notification using your preferred method (e.g., email, SNS, Slack).
import json
import boto3

def get_ou_name(ou_id):
    org_client = boto3.client('organizations')
    response = org_client.describe_organizational_unit(OrganizationalUnitId=ou_id)
    return response['OrganizationalUnit']['Name']

# extract_user_domain function
def extract_user_domain(principal_id):
    parts = principal_id.split(':')
    if len(parts) == 2:
        return parts[1]
    return "Unknown"

def lambda_handler(event, context):
    
    sns_topic_arn = "arn:aws:sns:us-east-1:xxxx1234xxxx:notify_on_move_account_sns"

    #if event detail has MoveAccount, then grab source and destination ou and send email via sns
    if event['detail']['eventName'] == 'MoveAccount':
        # Parse the CloudTrail event details
        source_ou_id = event['detail']['requestParameters']['sourceParentId']
        destination_ou_id = event['detail']['requestParameters']['destinationParentId']
        account_id = event['detail']['requestParameters']['accountId']
        principal_id=event['detail']['userIdentity']['principalId']
        user_domain = extract_user_domain(principal_id)
        
        source_ou_name = get_ou_name(source_ou_id)
        destination_ou_name = get_ou_name(destination_ou_id)

        # Prepare the email notification message
        
        message = f"CloudTrail event occurred: MoveAccount\n"
        message += f"Account ID: {account_id}\n"
        message += f"Source OU: {source_ou_name} (ID: {source_ou_id})\n"
        message += f"Destination OU: {destination_ou_name} (ID: {destination_ou_id})\n"
        message += f"Account Moved By: {user_domain}" 
        # Send email notification
        sns_client = boto3.client("sns")
        sns_client.publish(TopicArn=sns_topic_arn, Message=message)

    return {
        "statusCode": 200,
        "body": json.dumps("Email sent successfully")
    }

Here, you define a function get_ou_name(ou_id) that retrieves the name of an Organizational Unit (OU) based on its ID using the AWS Organizations client. This function will help you translate OU IDs into human-readable OU names.

This function extract_user_domain(principal_id) is used to extract the user or domain from the “principalId” field in the CloudTrail event. It splits the “principalId” on the colon character and, if two parts exist, it returns the second part, which typically represents the user or domain. If there are not two parts, it returns “Unknown.”

In the lambda_handler function, you specify the ARN (Amazon Resource Name) of the AWS Simple Notification Service (SNS) topic that will be used for sending notifications. Make sure to replace "arn:aws:sns:us-east-1:xxxx1234xxxx:notify_on_move_account_sns" with the actual ARN of your SNS topic.

The IF condition, checks if the CloudTrail event’s “eventName” is equal to ‘MoveAccount’, which indicates that an AWS account is being moved within your AWS Organization. If true then the logic extract details from the CloudTrail event. It collects the source OU ID, destination OU ID, the AWS account ID that’s being moved, and the “principalId” field to identify the user responsible for the move. It also uses the get_ou_name function to convert OU IDs into OU names.


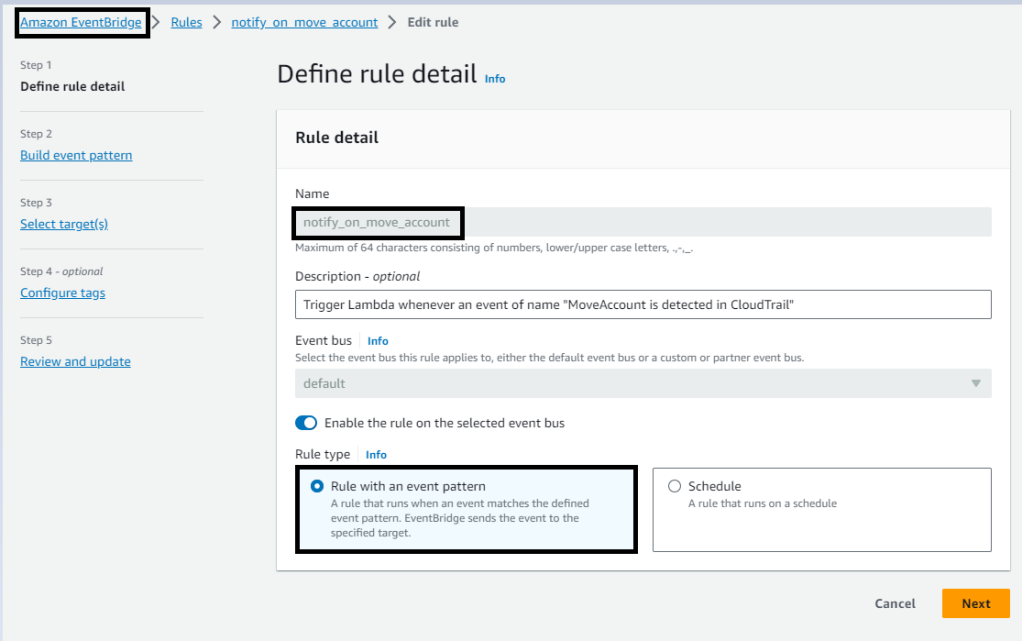
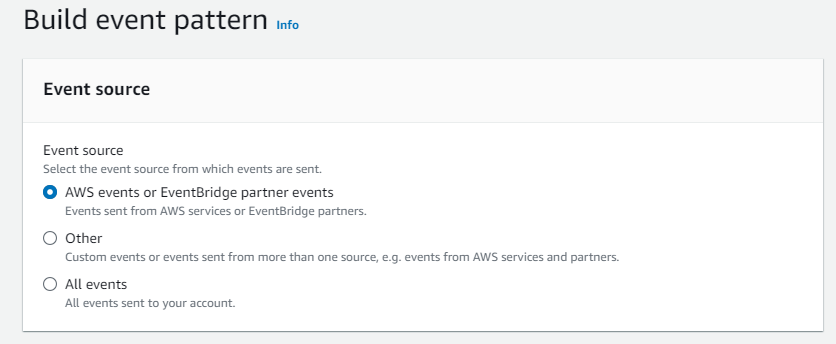
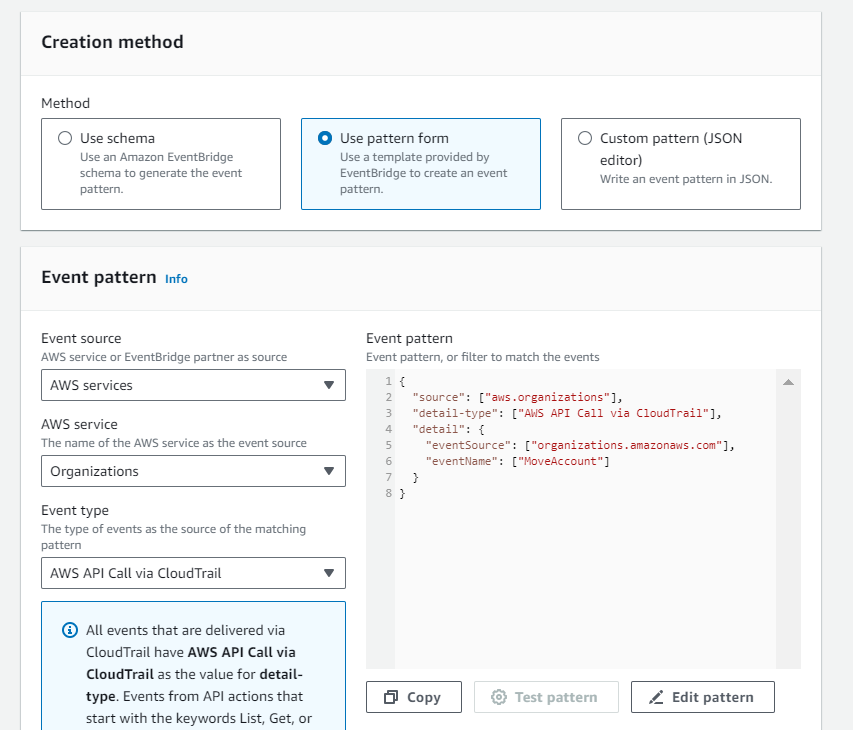
Setting Up CloudWatch Rules

With the Lambda function ready, you can create a CloudWatch Event rule. This rule specifies the conditions under which the Lambda function should be triggered. In this case, you’ll want to create a rule that captures events related to account movements within your AWS Organization.


Setting Up SNS

Configure an Amazon SNS (Simple Notification Service) topic and a subscription to roll out email notifications whenever an AWS account move is triggered by a Lambda function, follow these steps:

  1. Create an SNS Topic:
    • Log in to the AWS Management Console.
    • Navigate to the Amazon SNS service.
    1. Click on “Topics” in the SNS dashboard.
    2. Click the “Create topic” button.
    • Provide a name and a display name for your SNS topic.
    • Optionally, add any tags to help organize your topics.
    • Click “Create topic.”
  2. Create an Email Subscription:
    • After creating the SNS topic, select the topic you just created.
    1. Click the “Create subscription” button.
    2. Choose “Email” as the protocol.
    3. Enter the email addresses of the recipients you want to notify about account moves. You can add multiple email addresses, separating them with commas.
    4. Click “Create subscription.”
    • You will receive a confirmation email at the specified email addresses. Follow the link in the email to confirm the subscription.
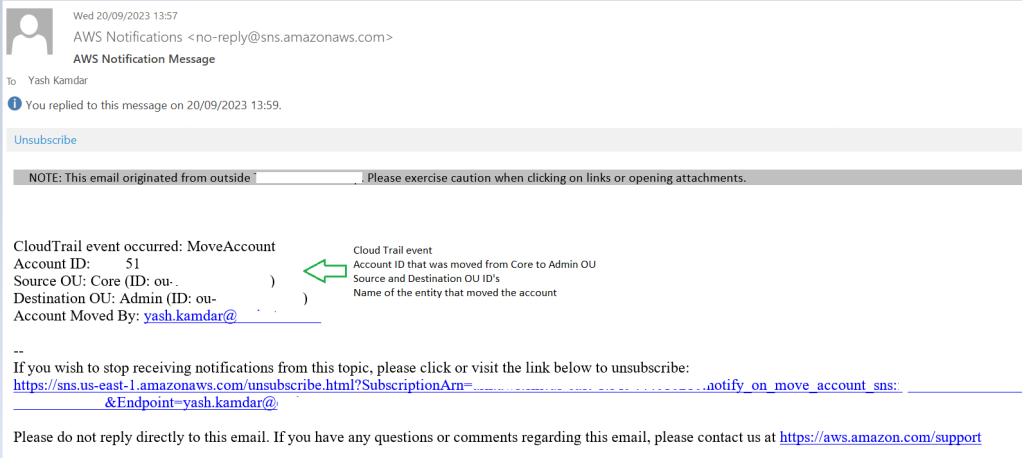
TESTING

Test your Lambda function to ensure that it publishes messages to the SNS topic when an account move is triggered. You should receive email notifications at the specified email addresses.


Overall, automating AWS account move notifications is a value-add because it enhances operational efficiency, improves security, and ensures compliance, ultimately contributing to a well-managed and accountable AWS environment. It streamlines the communication process and allows organizations to respond more effectively to changes within their cloud infrastructure.

Implementing Automatic EC2 Instance Shutdown with Cloud Custodian and Jenkins

This blog post is Part 2 of our series on Cloud Custodian for implementing Governance as Code in Cloud.

The previous blog post covered a basic understanding of Cloud Custodian, sort of getting familiar conceptually. It did not cover an actual business case but in this blog post we’ll walk through how to set up automatic EC2 instance shutdowns using Cloud Custodian, and integrate it seamlessly into your Jenkins CI/CD pipeline.

Managing costs in your AWS (Amazon Web Services) environment is crucial, and one effective way to achieve cost savings is by automatically shutting down EC2 instances during non-business hours or when they are not in use.

To achieve this, our Jenkins CI/CD pipeline is configured to trigger the Makefile, which compiles and prepares the necessary code for executing our Cloud Custodian policies. These policies, driven by Jinja templates, are then deployed to AWS environment, where they autonomously manage EC2 instances, ensuring cost-efficiency and resource optimization.

Here is what our directory structure looks like –

cloud-custodian/
│
├── policies/
│   │
│   # Cloud custodian policy file dynamically getting created here
│   │
├── templates/
│   │
│   └── cloud-custodian/
│       │
│       # Jinja templates for Cloud Custodian policies
│       │
│       └── instance-auto-shutdown.yaml.j2
│
└── tools/
    │
    │
    └── mugc.py
│
JenkinsFile
Makefile

Targeting Makefile from JenkinsFile :

Our Jenkinsfile will basically trigger a target in Makefile within which we will build our policy file using a Jinja template.

To target a Makefile from within a Jenkinsfile, you can use a sh (shell) step in your Jenkins Pipeline. You’ll execute the make command with the desired Makefile target as an argument.

pipeline {
    agent any

    stages {
        stage('Connect to AWS') {
            steps {
                script {
                 // Generate AWS CLI profile for assuming IAM role
                }
            }
        }
        stage('Build and Target Make') {
            steps {
                // Navigate to the directory containing your Makefile
                dir('path/to/your/makefile/directory') {
                    // Execute the Makefile target
                    sh "set +x;make ${make_action} TERRAFORM_FOLDER=${terraform_folder_path} \
                      AWS_ACCOUNT_ID=${pass var for your AWS account} \
                      AWS_REGION=${region} \
                      LAYER=cloud-custodian "
                }
            }
        }
    }
    
    // Add post-build actions or notifications as necessary
}

Makefile :

There are some good to know points which i think are important before you get your hands dirty with the Makefile that i am using.

  • Phony targets are targets that do not represent actual files, but rather they are used to specify a sequence of tasks or dependencies that need to be executed when the target is invoked.
  • Yasha is a Python library and command-line tool that provides functionality for working with Jinja2 templates. Specifically, it’s designed to render or generate text files based on Jinja2 templates and input data.
  • ?= is useful in Makefiles when you want to provide default values for variables but also allow users to override those defaults by setting the variables externally or within the Makefile itself.
# Declare the "all" target as a phony target. 
# Phony targets are not associated with files and always execute their commands.
.PHONY: all
# The default target, "all," depends on the "install-dependencies" target.
all: install-dependencies

# Variable assignments with conditional defaults.
TERRAFORM_FOLDER ?= ""
LAYER ?= ""
LAYER_FOLDER ?= "cloud-custodian"
AWS_REGION ?= "eu-west-1"
AWS_ACCOUNT_ID ?= ""
AWS_ACCOUNT_AUTO_SHUTDOWN ?= "<Target AWS Account ID for this policy>"

# Target to install dependencies.
install-dependencies:
    pip3 install yasha
    aws --version

# Target to render Cloud Custodian policies.
cloud-custodian-render-policies: install-dependencies
    @echo -e "\nRendering Cloud Custodian Policies\n" && \
    cd ${LAYER_FOLDER} && \
    yasha --aws_shared_services_account_id=${AWS_ACCOUNT_ID} --aws_account_auto_shutdown_id=${AWS_ACCOUNT_AUTO_SHUTDOWN} -o policies/instance-auto-shutdown.yaml templates/cloud-custodian/instance-auto-shutdown.yaml.j2 && \
    cat policies/instance-auto-shutdown.yaml

# Target to perform a dry run of Cloud Custodian policies.
cloud-custodian-plan: cloud-custodian-render-policies
    cd ${LAYER_FOLDER} && \
    custodian run --dryrun --region eu-west-1 --region me-south-1 --profile ${AWS_ACCOUNT_ID}-profile policies/instance-auto-shutdown.yaml -s tools/output

# Target to apply Cloud Custodian policies.
cloud-custodian-apply: cloud-custodian-plan
    cd ${LAYER_FOLDER} && \
    custodian run --region eu-west-1 --region me-south-1 --profile ${AWS_ACCOUNT_ID}-profile policies/instance-auto-shutdown.yaml -s tools/output
  1. The all target is declared as phony because it doesn’t correspond to an actual file, and it depends on the install-dependencies target.
  2. Variable assignments with conditional defaults are used to define variables that can be overridden by users when running the Makefile. If a variable is not already defined or is empty, it is assigned the specified default value.
  3. The install-dependencies target installs the necessary dependencies, yasha and the AWS CLI tool.
  4. The cloud-custodian-render-policies target depends on install-dependencies. It renders Cloud Custodian policies using the yasha tool and specifies the required parameters. It also displays the rendered policy for inspection.
  5. The cloud-custodian-plan target depends on cloud-custodian-render-policies. It performs a dry run of the Cloud Custodian policies using the custodian run command, specifying the AWS region and profile.
  6. The cloud-custodian-apply target depends on cloud-custodian-plan. It applies the Cloud Custodian policies to the specified AWS regions and profile.

Jinja Template :

policies:
  - name: auto-shutdown-ec2-{{ aws_account_auto_shutdown_id }}
    mode:
      type: periodic
      function-prefix: lz-cloud-custodian-
      schedule: "rate(5 minutes)"
      role: arn:aws:iam::{{ aws_shared_services_account_id }}:role/CloudCustodianRole
      execution-options:
        assume_role: arn:aws:iam::{{ aws_account_auto_shutdown_id }}:role/CloudCustodianAssumeRole
        metrics: aws
    resource: ec2
    filters:
      - type: offhour
        tag: CUSTODIANOFF
        default_tz: Asia/Dubai
        offhour: 15
    actions:
      - stop
      - type: tag
        tags:
          StoppedByCloudCustodian: Instance stopped by auto-shutdown-ec2-{{ aws_account_auto_shutdown_id }}.
  1. The Jinja2 template is used to generate Cloud Custodian policy definitions for EC2 instances.
  2. {{ aws_account_auto_shutdown_id }} and {{ aws_shared_services_account_id }} are Jinja2 placeholders, which will be replaced with actual values when rendering the template. We are passing both these values via Makefile.
  3. The policy has the following components:
    • name: Specifies the name of the policy, including the AWS account ID for auto-shutdown.
    • mode: Defines the execution mode of the policy. It’s set to periodic, running every 5 minutes. It also specifies the IAM role to assume (role) and additional execution options.
    • resource: Specifies the AWS resource type that this policy targets, which is EC2 instances in this case.
    • filters: Contains filter rules to select the instances to which the policy will be applied. In this case, it uses a filter of type offhour to target instances tagged with CUSTODIANOFF. It sets the default time zone to “Asia/Dubai” and the off-hour time to 15 (3:00 PM).
    • actions: Lists the actions to take on the selected instances. In this policy, it specifies actions to stop the instances based on filter and tag them with a message indicating that they were stopped by Cloud Custodian.
    • In short this Cloud Custodian policy will be deployed as a Lambda function in the target AWS account which will run every 5 minutes, filter the ec2 instances that are running and have a tag as CUSTODIANOFF and then if the current time is ahead of off-hour time i.e 03:00 PM then turn off that ec2 instance and also configure a tag on that ec2 instance with a message indicating that it was shutdown by Cloud Custodian.

Execution and verifying the results :

Jenkins console output –

If you remember in our Makefile we had a CAT cmd to display the content of the policy file that is being generated by Jinja template.
Here is an output of the CAT cmd showing up in the console output of my Jenkins run –

Lambda function in AWS –

Lets navigate to our AWS account and check if the Lambda function is deployed and if deployed check the logs to see if the cloud custodian has detected any ec2 instance that has tag set as CUSTODIANOFF which it needs to turn off.

As you can see the logs of the Lambda function clearly show that the Cloud Custodian policy was able to filter 1 ec2 instance that had CLOUDCUSTODIANOFF tag and which was in running state.

Cloud Custodian then as per the ACTIONS configured on filter went ahead and stopped the ec2 instance while also tagging that ec2 instance with a message that the instance was stopped by Cloud Custodian.

In this blog post, we’ve explored a powerful and efficient solution for managing your AWS EC2 instances: Cloud Custodian combined with Jenkins automation. By leveraging the capabilities of Cloud Custodian and Jenkins, you can ensure that your EC2 instances are stopped at specific times or under specific conditions, helping you optimize costs, enhance security, and streamline resource management.

Here are the key takeaways :

  1. Cost Optimization: Automatically stopping EC2 instances during off-hours or when they are not in use can significantly reduce your AWS costs. Cloud Custodian makes it easy to define and enforce such policies.
  2. Enhanced Security: Stopping instances that are not actively needed can improve your AWS environment’s security posture by reducing the attack surface.
  3. Jenkins Integration: Jenkins acts as the orchestrator, allowing you to schedule Cloud Custodian policy executions at specific times or in response to events.
  4. Flexibility: Cloud Custodian policies are highly customizable, enabling you to tailor them to your organization’s specific needs and compliance requirements.
  5. Resource Optimization: By stopping instances when they are not required, you free up resources for other workloads, making better use of your AWS infrastructure.
  6. Continuous Improvement: Use Jenkins pipelines to continuously update and refine your Cloud Custodian policies as your infrastructure evolves.

Implementing this solution can lead to cost savings, improved security, and better resource management in your AWS environment. Whether you’re managing a small development environment or a large-scale production system, Cloud Custodian and Jenkins offer a flexible and scalable approach to EC2 instance management.

Don’t hesitate to start implementing these practices in your AWS environment. If you have questions or need further assistance, please feel free to reach out. Thank you for reading, and happy cloud management with Cloud Custodian and Jenkins!

Implementing Cloud Governance as a code using Cloud Custodian

Why ?

You would assume, I would start with What is Cloud Custodian but in this case Why is more important.

As organizations continue to increase their footprint in public cloud, the biggest challenge they face is applying governance and effectively enforcing the policies.

Most organizations drive this process (detecting violations and enforcing policies to remediate those violations) in the form of multiple custom scripts. There are tools like for AWS Config and Azure policy that also solve the same problem that Custodian does but there are some pros and cons.

AWS Config and Azure Policy are fully managed services as opposed to Custodian where you manage the setup. Moreover Custodian is an open source tool which is free to use whereas to work with AWS Config you have to pay.

One another reason as to why Custodian is preferable is because it is not as tightly bound as AWS Config and Azure policy where there are some predefined rules which limits the customization.


What is Cloud Custodian ?

Cloud Custodian is an open source rule engine where you can define your policy in YAML and then by enforcing these policies you can manage your resources in public cloud for compliance, security, tagging and saving cost.


Scenario – Enforce a policy that detects missing tags in EC2 instances and adds those tags.

Prerequisites –

  • An AWS account
  • Python v3.7 and above
  • Basic understanding of resources in cloud
  • Proficiency in YAML

Installation –

For AWS, the installation is straight forward. Just log in to your AWS account and open AWS cloud shell and hit the following commands

python3 -m venv custodian
source custodian/bin/activate
pip install c7n

Defining a Policy –

A custodian policy consists –

  • Resource – Custodian can target resources in AWS, Azure as well as GCP. Resource is basically the target for which you want to enforce your policy like EC2, S3, VM etc…
  • Filters – Custodian allows you to target a subset or an attribute of resource using filters. A common way of defining the filter is via JMESPath
  • Actions – Custodian allows you to enforce a policy with the help of actions. You can define any kind of action like marking, deletion, sending a report etc…

For our scenario, below is a sample policy file written in YAML that targets EC2 instances for missing tags CI and SupportGroup and then defines a tag action to apply those 2 tags wherever missing.

	policies:
  - name: ec2-tag-compliance
    resource: ec2
    comment: |
      Report on total count of non compliant ec2 instances
    filters: 
      - or:
          - "tag:CI": absent
          - "tag:SupportGroup": absent
    actions:
      - type: tag
        tags:
          CI: Test
          SupportGroup: Test

TRY IT OUT –

In the AWS cloud shell, create a file ec2-tag-compliance.yaml.

touch ec2-tag-compliance.yaml

Using an editor like VI, copy paste the policy as above and then save and quit VI editor.

If you are not familiar with VI then take a look at this blog where you can learn and get familiar with basics of VI.

Let’s first try a dry run where the actions part of the policy is ignored. Using dry run you get to know what resources would be impacted and it is always a good practise to test your policy before directly applying it.

custodian run --dryrun --region me-south-1 ec2-tag-compliance.yaml -s custodian/

syntax - 
custodian run --dryrun --region <region code> <name of policy file> -s <path to export the output>

As you can see in the image below, after this command is run Cloud custodian went ahead and checked all the ec2 instances where the configured tags were missing.

It was able to locate one such ec2 instance and hence the count as 1 (highlighted in yellow rectangular box).

To get a grid view of the impacted resource you can use custodian report

custodian report --region me-south-1 ec2-tag-compliance.yaml -s custodian/

The result is an output in the form of grid where you get the InstanceId of the ec2 instance that was missing the tags mentioned in the policy.

Now that we know how our policy will impact our resources, lets go ahead and run the custodian command to enforce the policy (add the missing tags).

custodian run --region me-south-1 ec2-tag-compliance.yaml -s custodian/

You can see in the image above that the action:tag successfully being implemented on that one resource (ec2 instance) that had the missing tags.

Logging –

The following files are created when we run the custodian command –

  • custodian-run.log – Detailed console logs
  • metadata.json – Metadata of filtered resources in json format
  • resources.json – A list of filtered resources in json format

WHAT’S NEXT ?

While this is a very simple and straightforward way of running custodian locally, this is not how custodian would be used in live environments.

Following are the different ways in which custodian is usually deployed –

  • Independent lambda function
  • With a CI tool like Jenkins and implemented within a docker image

We will try to cover the above 2 methods in upcoming blog posts.