This post is part 2 of my series about converting different pages in SharePoint Online to PDF by using Power Automate (Flow) solution.
- Using Power Automate (Flow) to Convert SharePoint Online Wiki Pages to PDF.
- Using Power Automate (Flow) to Convert SharePoint Online Publishing Pages to PDF (this post).
Before we get into the How-TO, let’s review what SharePoint Online Publishing Pages are in the first place.
Publishing Pages in SharePoint Online are designed to serve 2 purposes i.e Managing content and the look and feel of the page. A Publishing page lives in a special document library called as Pages that provides version control and the SharePoint workflow feature. It’s designed for the management and distribution of content — the essence of publishing content to SharePoint.
Please note that by default you will not be able to find the Pages library where publishing pages are created. You need to go ahead and activate Publishing features for that in the site features first. How to do that is listed in detail over here.
Prerequisites
Before we begin, please make sure the following prerequisites are in place:
- An Office 365 subscription with access to Power Automate (Flow).
- Muhimbi PDF Converter Services Online Free, full or trial subscription (Start trial).
- Appropriate privileges to create Flows.
- Working knowledge of Power Automate (Flow).
Now, on to the details of how to create a Power Automate (Flow) solution to convert SharePoint Online publishing pages to PDF whenever a new publishing page is created or an existing publishing page is modified.
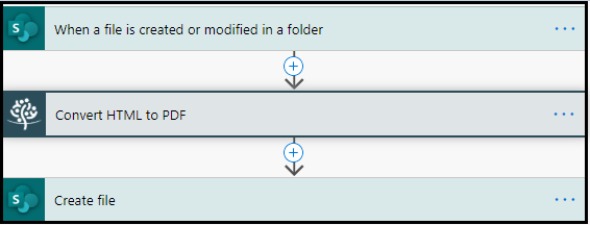
First let’s review how the basic structure of our Power Automate (Flow) looks :
Step 1 – Trigger
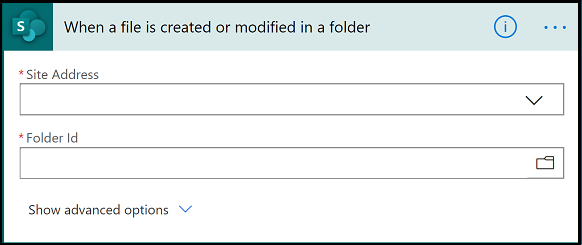
- We use the SharePoint trigger ‘When a file is created or modified in a folder’.
- Whenever a new publishing page is created, or an existing publishing page is modified, the Power Automate (Flow) will get triggered automatically.
- For the ‘Site Address’ in the image below, choose the correct site address from the drop down menu.
- For the ‘Folder Id’ in the image below, select the source folder.
Step 2 – Convert HTML to PDF
- In the ‘Source URL or HTML’ section shown in the image below, paste the page URL with the following information:
https://<Sitecollection>/sites/<SiteName>/Pages/<x-ms-file-name>?Isdlg=1
- The ‘?IsDlg=1‘ parameter highlighted in Red above is to remove the SharePoint and Chrome CSS components.
- The <x-ms-file-name> highlighted in the URL above is simply the FileName that we obtained from the dynamic content of the trigger action ‘When a file is created or modified’.
- In the ‘Page Orientation’ field, select the appropriate option. Depending on the content and layout of the page ‘Potrait’ may work out better.
- In the ‘Media Type’ field, select the ‘Print’ option from the drop down menu. (This automatically strips out most of the SharePoint User interface).
- Select ‘SharePoint Online’ as the ‘Authentication type’ from the drop down menu.
- That being said, you will need to enter the correct ‘User name’ and ‘Password’ to get authenticated with the SharePoint Online authentication that you selected in the authentication field above.
- In the ‘Conversion Delay’ field, enter a delay of 15000 (in milliseconds, so 15 seconds). This delay will give the page time to load before it is converted.
Step 3 – Create File
- For the ‘Site Address’ in the image below, choose the correct site address from the drop down menu.
- Select the correct ‘Folder Path’ where the converted PDF should be created.
- Give a meaningful ‘File Name’ to the created PDF, but make sure you remember to add the extension ‘.pdf’ after the ‘File Name’ and to make the file name unique, or multiple runs of the flow will overwrite the same file. I recommend basing it on the source file name, but with some kind of suffix.
- Select the ‘Processed file content’ option, shown in the image below, to populate the ‘File Content’ field.
That is it, create or update a publishing page, wait a few seconds, and then open the generated PDF.
To see the fruits of our labor, please see below what the publishing page looks like when viewed in a browser and how it looks as a PDF.
Source Publishing Page –
Converted PDF –
Keep checking this blog for exciting new articles about Power Automate, SharePoint Online, Power Apps, as well as document conversion and manipulation using The Muhimbi PDF Converter.


