This post is part 2 of a 2 part series on Image Identification/Recognition using Azure Cognitive Services.
In our previous post we created a Canvas application so as to capture an Image using the Camera control of PowerApps and then pass it to our Azure Cognitive service for Image Identification/Recognition hosted in Azure environment
To reduce the complexity, we have divided this article in two parts:
- Design a Canvas App with The Camera Control to capture Images for Identification/Recognition
- Power Automate (Flow) solution to Identify/Recognize an Image
Prerequisites-
Before you begin, please make sure the following prerequisites are in place:
- An Office 365 subscription with access to PowerApps and Power Automate (Flow).
- An Azure Subscription to host an Image recognition cognitive service.
- Power Automate Plan for consuming the HTTP Custom actions.
- Appropriate privileges to create Power Apps and Power Automate(Flow).
- Working knowledge of both Power Apps and Power Automate(Flow).
Now that the prerequisites are in place, Go back to the “Image Recognition” Power Automate (Flow) that we started creating earlier in the step 2 of this blog.
Step 3 – Create File
- For the ‘Site Address’ as shown in the image below, enter the correct site address from the drop down menu where you intend to create the image file against the image captured in Camera control of PowerApps.
- For the ‘Folder Path‘, select the appropriate Library using the Folder menu on the right hand side.
- For the ‘File Name‘, give a name as per your choice but make sure you do not forget to add the ‘.jpg‘ extension.
- For the ‘File content‘ as shown in the image below, Navigate to Add to Dynamic content line and select ‘Outputs‘ option available inside the ‘Compose‘ action.

Step 4 – HTTP Trigger
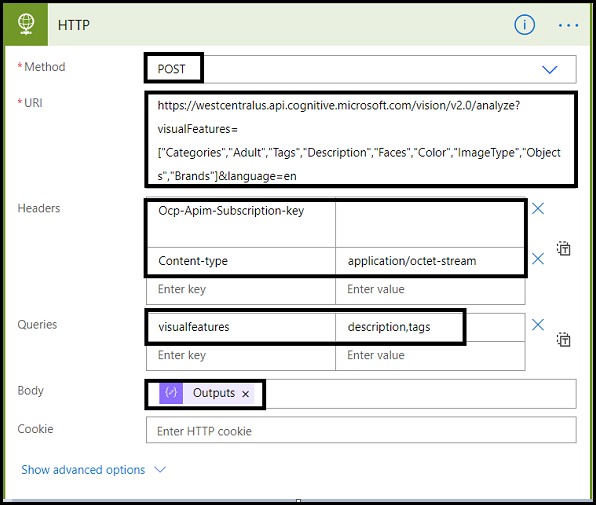
- Insert an ‘HTTP‘ action and select the ‘Post‘ method from the drop down menu.
- For the ‘URI‘ as shown in the image below, enter the below mentioned URI where we will be making a simple call to our API i.e the Image Recognition Cognitive Service hosted in the Azure environment.
https://westcentralus.api.cognitive.microsoft.com/vision/v2.0/analyze?visualFeatures=%5B“Categories”,”Adult”,”Tags”,”Description”,”Faces”,”Color”,”ImageType”,”Objects”,”Brands”]&language=en
- For the ‘Headers‘ as shown in the image below, you need to enter the ‘Ocp-Apim-Subscription-key‘ as well as the ‘Content-type‘.
- You can obtain the ‘Ocp-Apim-Subscription-key‘ from the Azure environment which is basically the ‘Subscription key‘ that you obtain once you have configured the Cognitive service.
- For the ‘Queries‘ as shown in the image below, enter the value as ‘Description,Tags‘ against the ‘visualfeatures‘.
- For the ‘Body‘ field, Navigate to ‘Add dynamic content‘ line and choose value ‘Outputs‘ available under the ‘Compose‘ action.
Step 5 – Parse JSON
- Next we need to parse the response obtained from The Cognitive Services API i.e the HTTP post request in order to extract the identified/recognised text.
- For the ‘Content‘ as shown in the image below, Navigate to the Add dynamic content line and choose ‘Body‘ option available inside ‘HTTP‘ action.
- For the ‘Schema‘ please use the payload as below-
{“type”: “object”,“properties”: {“tags”: {“type”: “array”,“items”: {“type”: “object”,“properties”: {“name”: {“type”: “string”},“confidence”: {“type”: “number”}},“required”: [“name”,“confidence”]}},“description”: {“type”: “object”,“properties”: {“tags”: {“type”: “array”,“items”: {“type”: “string”}},“captions”: {“type”: “array”,“items”: {“type”: “object”,“properties”: {“text”: {“type”: “string”},“confidence”: {“type”: “number”}},“required”: [“text”,“confidence”]}}}},“requestId”: {“type”: “string”},“metadata”: {“type”: “object”,“properties”: {“width”: {“type”: “integer”},“height”: {“type”: “integer”},“format”: {“type”: “string”}}}}}

Step 6 – Initialize Variable
- Add an ‘Initialize Variable‘ action and for the ‘Name‘ as shown in the image below, give a meaningful name like ‘OutputText‘.
- For the ‘Type‘, select ‘String‘ from the drop down menu.

Step 7 – Apply to each
- The ‘Parse JSON‘ action will parse the output of the Image Recognition Cognitive Services API.
- We will add an Apply to each conditional logic to loop through all the available properties parsed by our Parse JSON action.
- The property that preserves the recognized text is ‘Caption‘ which is a property native to and spit by our Image Recognition Cognitive Service hosted in Azure.
- In the ‘Select an output from previous step‘ as shown in the image below, Navigate to Add dynamic content line and choose ‘Captions‘ available under the ‘Parse JSON‘ action.
- Next we will set the variable ‘OutputText‘ initialized in the previous steps with the ‘text‘ property inside the Captions object that has the final identified/recognised text.
- Add a ‘Set Variable‘ action and for the ‘Name‘ select the correct variable i.e ‘OutputText‘ from the drop down menu.
- For the ‘Value‘ as shown in the image below, Navigate to Add dynamic content line and choose option ‘Text‘ available inside ‘ParseJSON‘ action.

Step 8 – Update File properties
- Now that we have the identified/recognized text and safely preserved it in our OutputText variable, let us go ahead and update the Image file created in SharePoint with the Identified/Recognized text.
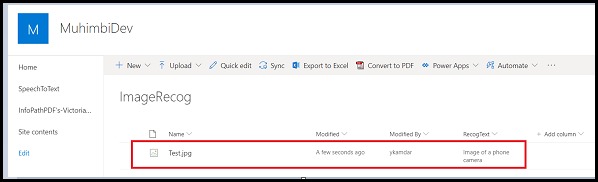
- I have simply created a column in my SharePoint library where we create the captured image from PowerApp with the name of the column being ‘RecogText‘.
- Add an ‘Update file properties‘ action and for the ‘Site Address‘ as shown in the image below, select the correct site address.
- For the ‘Library Name‘ select the correct library name from the drop down menu where we create our image.
- For the ‘Id‘ field, Navigate to Add dynamic content line and select ‘ItemId‘ option available under the ‘Create file‘ action.
- For the ‘RecogText‘ field available once you enter the correct site address and the library name, Navigate to Add dynamic content line and select OutputText available under the list of variables.

That’s all that is needed to do.
Let us now go ahead and check if our Power Automate solution is indeed working as per our expectation and spitting the right text against the identified image.
Photo captured in Camera control of PowerApps-

Image Created in SharePoint Library and Recognized Text –

[…] Identify/Recognize Images in PowerApps Using Custom Vision […]
LikeLike
[…] Power Automate (Flow) solution to Identify/Recognize an Image […]
LikeLike